.svg)
No items found.
What is in the MinIO Subscription Network?

Minio server supports Amazon S3 compatible bucket event notification for following targets AMQP, Elasticsearch , Redis, nats.io, PostgreSQL and Apache Kafka. Part 1 of this blog series covers sending bucket notifications via AMQP using RabbitMQ server. You may compare this setup to AWS S3 & SQSservices.
I used Ubuntu Linux 16.04, latest Minio server binary and RabbitMQ 3.5.7–1 on my laptop for this setup.
Install RabbitMQ server and enable the management plugin.
$ sudo apt-get install rabbitmq-server
$ sudo rabbitmq-plugins enable rabbitmq_management
Create a user named “myuser” with password “mypassword”. For your production environment you may want to choose your access credentials with security in mind.
$ sudo rabbitmqctl add_user myuser mypassword
$ sudo rabbitmqctl set_user_tags myuser administrator
$ sudo rabbitmqctl set_permissions -p / myuser ".*" ".*" ".*"
Latest Minio server binary can be downloaded from https://minio.io/downloads/
$ wget https://dl.minio.io/server/minio/release/linux-amd64/minio
$ chmod +x minio
In this case “myphotos” is used as my data directory for Minio server.
$ ./minio server myphotos
Endpoint: http://10.1.10.150:9000 http://127.0.0.1:9000
AccessKey: 7I6R5G576YI641GS9J9F
SecretKey: SuycBIe+O/s5zXxU9w+N4wkXHpBCKa2H6Ptlrc8c
Region: us-east-1
...
...
The default location of Minio server configuration file is ~/.minio/config.json. Update the AMQP configuration block in ‘config.json’ as follows.
"amqp": {
			"1": {
				"enable": true,
				"url": "amqp://myuser:mypassword@localhost:5672",
				"exchange": "bucketevents",
				"routingKey": "bucketlogs",
				"exchangeType": "fanout",
				"mandatory": false,
				"immediate": false,
				"durable": false,
				"internal": false,
				"noWait": false,
				"autoDeleted": false
			}
        }
Restart the Minio server to reflect config changes made above. Minio supports all the exchange available in RabbitMQ. For this setup we are using fanoutexchange.
Step 1: Download and install Minio client
$ wget https://dl.minio.io/client/mc/release/linux-amd64/mc
$ chmod 755 mc
Step 2: Add Minio server host alias information
Configure Minio client with access and secret keys pointing to the Minio server.
$ ./mc config host add myminio http://localhost:9000 7I6R5G576YI641GS9J9F SuycBIe+O/s5zXxU9w+N4wkXHpBCKa2H6Ptlrc8c
Step 3: Enable bucket notification
In this example we will enable bucket events only when JPEG images are uploaded or deleted from ‘images’ bucket on ‘myminio’ server. Here ARN value is arn:minio:sqs:us-east-1:1:amqp. To understand more about ARN please follow AWS ARN documentation.
$ ./mc mb myminio/images
$ ./mc events add  myminio/images arn:minio:sqs:us-east-1:1:amqp    --suffix .jpg
$ ./mc events list myminio/images
arn:minio:sqs:us-east-1:1:amqp s3:ObjectCreated:*,s3:ObjectRemoved:* Filter: suffix=”.jpg”
Step 4: Watch for events on exchange
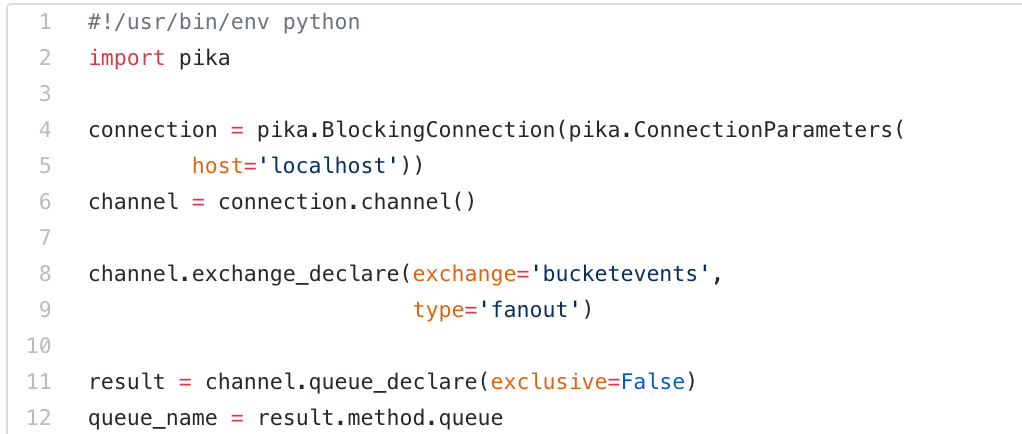
Below python script waits on queue exchange ‘bucketevents’ and prints event notification on console. It uses pika python client library for RabbitMQ.
#!/usr/bin/env python
import pika

connection = pika.BlockingConnection(pika.ConnectionParameters(
        host='localhost'))
channel = connection.channel()

channel.exchange_declare(exchange='bucketevents',
                         type='fanout')

result = channel.queue_declare(exclusive=False)
queue_name = result.method.queue

channel.queue_bind(exchange='bucketevents',
                   queue=queue_name)

print(' [*] Waiting for logs. To exit press CTRL+C')

def callback(ch, method, properties, body):
    print(" [x] %r" % body)

channel.basic_consume(callback,
                      queue=queue_name,
                      no_ack=False)

channel.start_consuming()
Execute this example python script to watch for RabbitMQ events on the console.
$ python rabbit.py
Open another terminal and upload a JPEG image into “images” bucket.
$ ./mc cp myphoto.jpg myminio/images
You should receive the following event notification via RabbitMQ once the upload completes.
$ python rabbit.py
‘{“Records”:[{“eventVersion”:”2.0",”eventSource”:”aws:s3",”awsRegion”:”us-east-1",”eventTime”:”2016–09–08T22:34:38.226Z”,”eventName”:”s3:ObjectCreated:Put”,”userIdentity”:{“principalId”:”minio”},”requestParameters”:{“sourceIPAddress”:”10.1.10.150:44576"},”responseElements”:{},”s3":{“s3SchemaVersion”:”1.0",”configurationId”:”Config”,”bucket”:{“name”:”images”,”ownerIdentity”:{“principalId”:”minio”},”arn”:”arn:aws:s3:::images”},”object”:{“key”:”myphoto.jpg”,”size”:200436,”sequencer”:”147279EAF9F40933"}}}],”level”:”info”,”msg”:””,”time”:”2016–09–08T15:34:38–07:00"}\n’
You can make your own script using different language bindings available on official RabbitMQ documentation.
Step 5: Testing on RabbitMQ
Use rabbitmqctl command-line tool to test the setup.
$ sudo rabbitmqctl list_exchanges
Listing exchanges …
direct
amq.direct direct
amq.fanout fanout
amq.headers headers
amq.match headers
amq.rabbitmq.log topic
amq.rabbitmq.trace topic
amq.topic topic
bucketevents fanout
“bucketevents fanout” states that an RabbitMQ exchange has been successfully created as type: ‘fanout’.
For further questions and comments join our Slack chat at: https://slack.minio.io