.svg)
AIStor Table Sharing

Overview
Architectural Constraints in Hybrid Analytics
Modern analytics and AI platforms such as Databricks are frequently deployed in public cloud environments to take advantage of elastic compute, managed services, and scalable infrastructure. At the same time, much of the enterprise data required for these workloads remains on-premises. This is not simply historical inertia. In most environments, it is the result of deliberate architectural and operational decisions.
Organizations attempting to connect cloud analytics platforms to on-premises data typically encounter three constraints:
1. Data Sovereignty and Regulatory Requirements
Many industries operate under strict data residency and sovereignty rules. Financial transaction data, manufacturing telemetry, healthcare records, and government datasets may be legally or contractually required to remain within specific geographic or controlled infrastructure boundaries. Even when regulations permit cloud use, internal governance frameworks often restrict where authoritative datasets may be stored or replicated. As a result, relocating core datasets to public cloud object storage is frequently not an option.
2. The Cost of Data Replication
For high-volume datasets, copying data into the cloud can be economically impractical. Replicating petabyte-scale datasets introduces:
- Additional storage costs
- Network egress and transfer fees
- Ongoing synchronization pipelines
- Operational overhead to manage duplicate copies
Maintaining mirrored environments increases complexity and long-term infrastructure spend. Over time, version drift and synchronization delays become additional operational risks.
3. Latency and Time-to-Insight
In high-velocity environments such as manufacturing, IoT, financial systems, or security telemetry, data is generated continuously and at scale.

Traditional integration approaches rely on:
- Batch exports
- Periodic synchronization jobs
- Replication pipelines
These processes introduce delay between data generation and analysis. By the time cloud analyticsplatforms access the data, it may already be stale.
For operational analytics and AI workflows, this delay directly impacts time-to-insight
Bridging On-Premises Data and Cloud Comput
The challenge is not whether analytics should run in the cloud or on-premises. The challenge is enablingcloud-based compute platforms to access on-premises data securely, economically, and withoutintroducing replication delays.
The following sections describe how AIStor Table Sharing enables this model using the open Delta Sharingprotocol embedded directly in the storage layer
Introduction: AIStor Table Sharin
MinIO is the leader in providing 100% S3 API compatible object storage for organizations around the world.After Databricks published the protocol for Delta Sharing, it was added to the AIStor Enterprise binary. Byintegrating the protocol directly into the executable and avoiding complex and costly 3rd party “side car”solutions, administrators have a streamlined method that addresses the challenges of sharing data whilemaintaining strict consistency and authority over their data sources.
AIStor Table Sharing is a native implementation of Delta Sharing in AIStor. Enterprise features are includedto mitigate issues with performance, scalability, security, and administration
Native Delta Sharing Protoco
The Delta Sharing Protocol is built into the AIStor binary and can be leveraged in both bare-metal andcontainer based deployments with complete feature parity. This enables developers and administrators tostreamline their operations and maintain compatibility across all environments
Support for both Delta and Iceberg table
The specifications for the Delta Sharing Protocol already support both types of OTFs, but the referenceimplementation only provided Delta Table support. AIStor Tables provides a native Iceberg REST endpointand combines the Delta Protocol with the Iceberg catalog that is included in AIStor
Token Management and Authenticatio
Delta Sharing can utilize either bearer tokens or Oauth2 for authorizations when a consumer applicationmakes a request to the AIStor Table Sharing endpoint. Both methods can be used for one or more sharesthat originate from the same endpoint.
Example: A local client could utilize a bearer-token for authorization and an external client would requireauthentication to their identity provider (“IdP”) before proceeding to access sensitive data
Administration of Share
AIStor Table Sharing includes features for creating, updating, and deleting the warehouses,schemas, andtables that make up a Delta Share. This is accomplished without downtime or service interruption
Prerequisite
While much of this can be accomplished by downloading packages and installing/configuring them on yourown, those steps are beyond the scope of this guide. And in most production environments, the use oftrusted containers will be preferred.
Attention to versions and compatibility matrices between different software components is also crucial toavoid complex debugging steps. https://docs.delta.io/releases
Softwar
Linux distributions for X86_64 and ARMv8 are supported. Apple platforms will also work for developmentpurposes (X86_64 and Apple Silicon/ARM). When pulling an image down from Quay.io for the JupyterNotebook, pay careful attention to the architecture that you intend to run your containers on.
- PySpark: 3.5.3+
- AIStor EDGE: 2026-01-14
- AIStor Container
- AIStor “mc” CLI utilit
Installing the AIstor “mc” CLI
To interact with the AIstor EDGE instance, a command linetool is provided by MinIO to perform actions using an administrative identity.
Connecting to your environment from the command line usingthe mc CLI will require downloading and installing the correct platform release for where you areexecuting the commands.
The latest RELEASE is provided in the following links:
- MacOS/Apple Silicon: https://dl.min.io/aistor/mc/release/darwin-arm64/mc
- MacOS/x86_64: https://dl.min.io/aistor/mc/release/darwin-amd64/mc
- Linux/ARM: https://dl.min.io/aistor/mc/release/linux-arm64/mc
- Linux/x86_64: https://dl.min.io/aistor/mc/release/linux-amd64/mc
NOTE: The latest RELEASE image includes the AIStor TableSharing options, but this is not signed by the Apple App store, therefore check with your platformadministrator to review any procedures
Example: (Ubuntu/x86_64
wgethttps://dl.min.io/aistor/mc/release/linux-amd64/mc -o mc
chmod+x ./mc
mv ./mc /usr/local/bin/
mc--version
mcalias set minio http://localhost:9000 minioadmin minioadmi
Hardwar
Depending on the level of responsiveness desired and thevolume of data you are working with, the recommendations for a self-hosted lab environment: (i.e on alaptop/desktop)
PySpark
- CPU: 4 cores (8 cores recommended)
- MEMORY: 4 GB (8 GB recommended)
- STORAGE: 16 GB (40 GB recommended and NVMe/SSD)
AIStor (personal development)
single node/single drive
- CPU: 2 cores (8 cores recommended)
- MEMORY: 4 GB (16 GB recommended)
- STORAGE: 16 GB (40 GB recommended and NVMe/SSD
As larger datasets and complex SQL queries are explored,additional resources will be required. For sizing a shared development environment or a production deployment,please refer to the MinIO Sizing Guide: Link
Networking
MinIO AIStor is designed with simplicity and scalability inmind. Network requirements will depend on the volume of data and frequency of access that is desired. Evenin a small lab, 1Gbps connections are often sufficient to validate connectivity and APIs. But to fullyappreciate the capabilities of AIStor within a production environment , administrators will leverage 25Gbps(and often multiple 100Gbps interfaces) interfaces to meet the demands of modern AI/ML use cases.
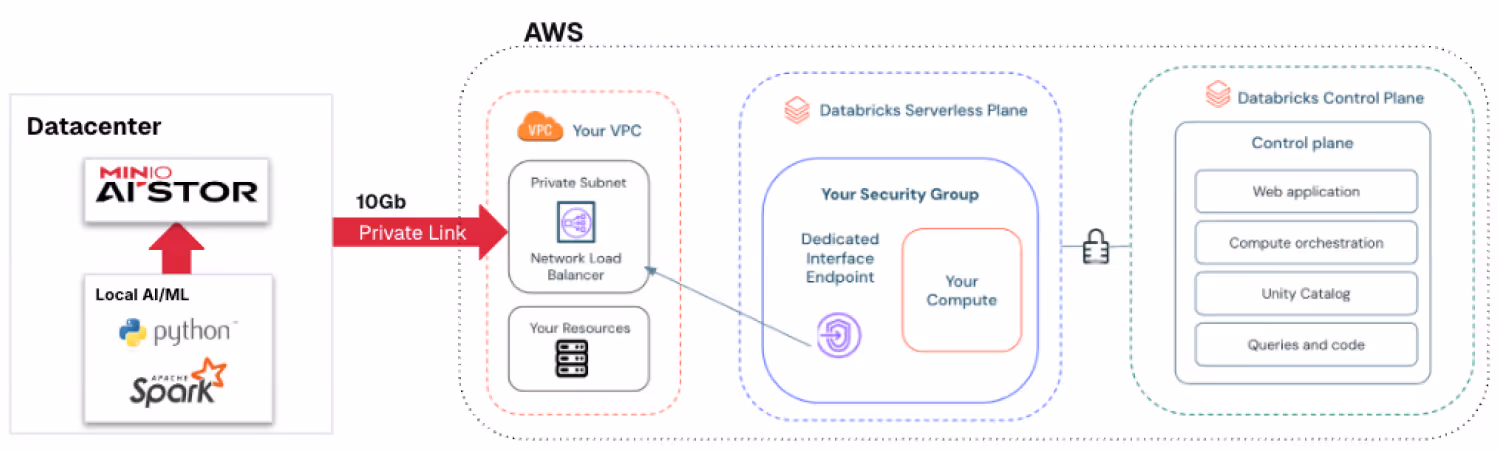
The two methods take different approaches in this guide.with one using local container networking and the other a centralized approach to the AIStor Edge cluster.External access to Databricks can be provided either over the Internet (not recommended for production) orutilizing hyperscaler offerings the secure communications links between on-prem and public cloud
While the Private Link/Private Service Connect options offeroptimal security footprint, cloud providers also have options for low latency connections in severalcities/regions. Combining these methods provide the lowest latency and highest level of security:
- AWS - Direct Connect and/or AWS/Private Link
- Azure - ExpressRoute and/or Azure/Private Link
- GCP - Cloud Interconnect and/or Private Service Connec
Securit
The scope of this guide will utilize basic authenticationwith access/secret keys for local containers. Unless otherwise required with the second method of working with adedicated AIStor cluster, all examples will use http instead of https for API requests.
Local users can be provisioned to explore additionalfeatures and work with policies, but that is not required to complete this guide
AIStor Tables include options for granular policies relatedto accessing tables and paths. Documentation related to policies enabling/restricting user/group accessare published on the MinIO website: docs.min.io
While network security is predicated on TLS certificates,authentication to AIStor can utilize access/secret keys or integration with a specific identity provider (IdP)for enhanced security. For a more detailed description of security options with AIStor, please refer tothe following link: https://docs.min.io/enterprise/aistor-object-store/administration/iam/
Bearer token
The simplest method for accessing an AIStor Table Share iswith a statically generated bearer-token that is provided through AIStor Table Sharing.
Oauth2 via OIDC
While it is possible to integrate AIStor with an OIDCprovider, we will cover that in a follow up article that explores security and authentication/authorization ingreater detail.
Procedure
There are two methods you can follow within this guide.Either one will work with the AIStor Table Sharing features, but you can utilize either an existing AIStor EDGEdeployment in your environment or deploy containers with which to self-host this on yourdesktop/laptop.
For a self-contained development environment, adocker-compose yaml is provided that includes a current release of PySpark/Jupyter Lab in addition to a contain withthe EDGE release of AIStor.
Where a centrally managed and shared AIStor environment isavailable, you can simply deploy a local container for just the PySpark/Jupyter Lab and connect in tothe AIStor object storage on your network. This second method is what will be required if you wish torun some of the examples at the end of this document and do testing with Databricks.
Method 1: Provisioning both AIStor and PySpark with local networ
NOTE: Before proceeding with installation, you will needto register for a FREE AIStor community license fromthe following link: https://www.min.io/pricing
While the license is limited to a single node, it enablesthe features for AIStor Tables and AIStor Table Sharing that we will use from this point forward.
Here is a comprehensive docker-compose that includes bothAIStor and PySpark containers along with local networking to simplify connectivity. Copy the contentsinto a YAML file called “compose.yaml”. The following is a docker-compose example that should work formost desktop environments
version:'3.8'services:spark-notebook:image: quay.io/jupyter/pyspark-notebook:spark-3.5.3container_name: pyspark-jupyterports:- "8888:8888"- "4040:4040" # Spark UI (optional)environment:- JUPYTER_ENABLE_LAB=yes- GRANT_SUDO=yes- NB_UID=1000- NB_GID=1000- CHOWN_HOME=yes#Very useful when working with AIStor object storage- AWS_ACCESS_KEY_ID=minioadmin- AWS_SECRET_ACCESS_KEY=minioadmin- AWS_DEFAULT_REGION=us-east-1- AWS_ENDPOINT_URL=http://minio:9000- AWS_S3_ENDPOINT=http://minio:9000- SPARK_LOCAL_IP=spark-notebookvolumes:- ./notebooks:/home/jovyan/work- ./data:/home/jovyan/datacommand: start-notebook.sh --NotebookApp.token=''--NotebookApp.password=''healthcheck:test: ["CMD", "curl", "-f","http://localhost:8888"]interval: 30stimeout: 10sretries: 5networks:- spark-minio-netdepends_on:- miniominio:image: quay.io/minio/aistor/minio:latestcontainer_name: minio-aistorports:- "9000:9000"# port for API- "9001:9001"# port for Consoleenvironment:- MINIO_ROOT_USER=minioadmin- MINIO_ROOT_PASSWORD=minioadminvolumes:- ./minio-data:/data- ./minio.license:/minio.license# validate local path to licensecommand: server /data --console-address ":9001"healthcheck:test: ["CMD", "curl", "-f","http://localhost:9000/minio/health/live"]interval: 30stimeout: 20sretries: 3networks:- spark-minio-netnetworks:spark-minio-net:driver: bridgename: spark-minio#Optional: uncomment if you want persistent named volume instead of host folder#volumes:#minio-data volumes:- ./minio-data:/data- ./minio.license:/minio.license# validate local path to licensecommand: server /data --console-address ":9001"healthcheck:test: ["CMD", "curl", "-f","http://localhost:9000/minio/health/live"]interval: 30stimeout: 20sretries: 3networks:- spark-minio-netnetworks:spark-minio-net:driver: bridgename: spark-minio#Optional: uncomment if you want persistent named volume instead of host folder#volumes:#minio-dataWhen you are ready, you can bring up both containers withthe following comman
$docker compose u
At this point, you should have two containers runninglocally.
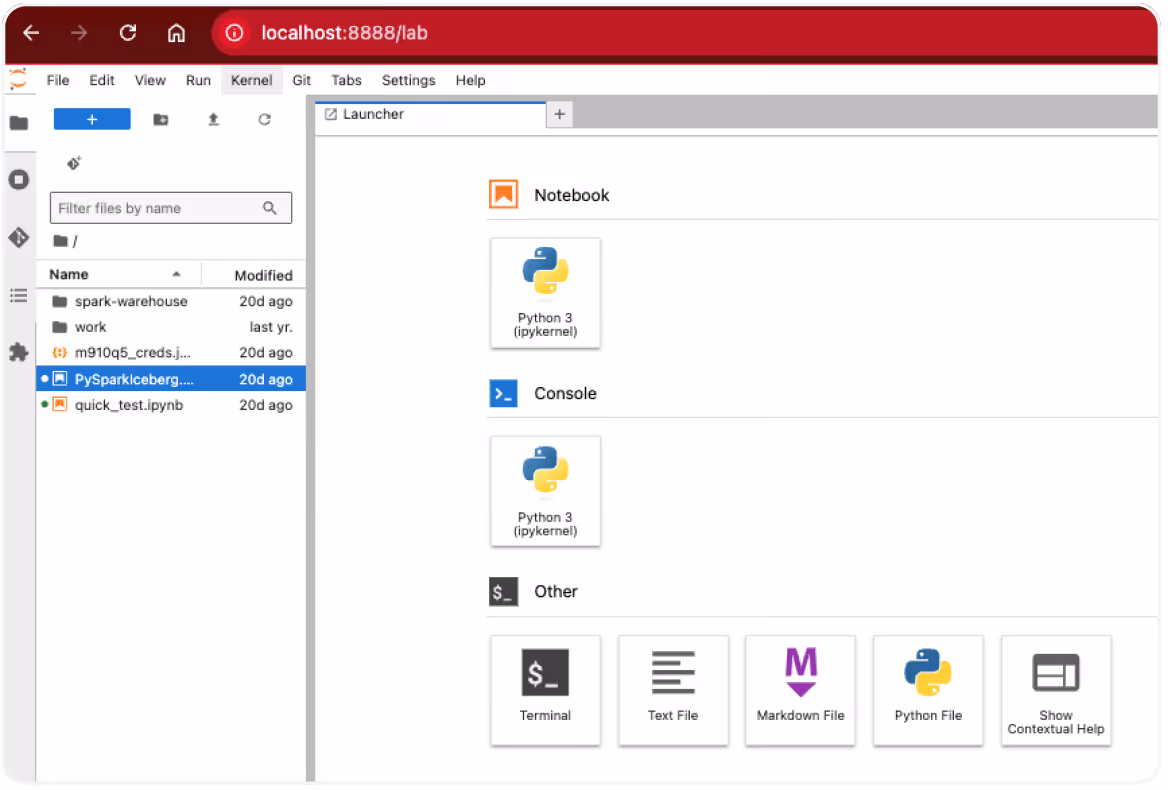
- PySpark Jupyter Lab: http://localhost:8888/labAccess token: not required
- Access token: not required
- AIStor (single-node): http://localhost:9001/
- Login/access_key: minioadmin
- Password/secret_key: minioadmin
Since this is a local development environment, we havesecurity credentials stored as environment variables. In Method 2, we will instead utilize anenvironment file to source those details
Method 2: Setting up the standalone PySpark containe
Jupyter PySpark Notebook
Search for pyspark-notebook with release tag=3.5.3
- (linux-x86) quay.io/jupyter/pyspark-notebook:spark-3.5.3
- (linux-arm)quay.io/jupyter/pyspark-notebook:aarch64-spark-3.5.
Example for pulling down the container locally (Docker)
$ docker pull quay.io/jupyter/pyspark-notebook:spark-3.5.3
$ docker run -p 8888:8888 \

--name pyspark_notebook \
-e JUPYTER_TOKEN='Welcome123' \
jupyter/pyspark-notebook:spark-3.5.
NOTE: A more complete Docker compose template thatincludes both AIStor and PySpark is discussed in the previous Method 1 section.
This will start a container accessible via http://localhost:8888/lab and with the token Welcome123
Setting up AISto
While a multi-node/multi-drive AIStor deployment can beutilized, it is beyond the scope of this document toto go through all the steps and procedures. Please see theonline AIStor documentation for a more detailed explanation of requirements and instructions
Link: https://docs.min.io/enterprise/aistor-object-store/installation
But for evaluation purposes and running locally, a simple installation is possible that leverages either a container from Quay or deploying a bare-metal approach. The container method is likely less involved from a deployment standpoint, but it also adds the requirement to have another host that can host the AIStor Object Storage.
Adding Delta and Iceberg Tables to AIStor
A brief description of Open Table Formats
Iceberg and Delta Lake are open table formats designed to bring reliability, performance, and governance to data lakes. They share many core ideas but differ in design choices and ecosystem focus.
Similarities
Both Iceberg and Delta provide ACID transactions on top of cloud object storage (such as S3, ADLS, or GCS), allowing reliable reads and writes without traditional databases. They support schema evolution (adding, renaming, or changing columns), time travel (querying historical versions of a table), and partition evolution, so partition schemes can change without rewriting data.
Each uses columnar file formats like Parquet and is optimized for large-scale analytics. They also aim to decouple storage from compute and thereby enable multiple engines to read the same data. Operationally, both help prevent common data-lake issues such as partial writes, corrupted files, and inconsistent reads. With both approaches, high performance object storage is the preferred method for building ascalable data-lake.
Differences
The biggest differences are in architecture, openness, and ecosystem alignment.
Transaction & metadata model:
- Delta Lake uses a transaction log (JSON + Parquet checkpoints) stored alongside the data.
- Iceberg uses a manifest-based metadata hierarchy (snapshots, manifests, and manifest lists), designed to minimize metadata scanning and scale efficiently to very large tables.
Engine support:
- Iceberg was designed from the start for multi-engine interoperability and has strong native support across Spark, Flink, Trino, Presto, Hive, and others.
- Delta Lake is deeply integrated with Apache Spark and Databricks, with expanding support outside that ecosystem.
Governance & catalogs:
- Iceberg integrates tightly with external catalogs (Hive Metastore, AWS Glue, REST catalogs).
- Delta Lake traditionally relies on the log and Databricks tooling, though open catalog support by the community has been improved as seen with Delta Sharing.
Overall, both formats solve the same core problems for modern data lakes. Iceberg emphasizes engine-agnostic design and scalable metadata, while Delta Lake emphasizes tight Spark integration, simplicity, and a mature Databricks ecosystem.
Adding a Delta "database/schema"
If you already have a set of Delta schemas and tables, you can skip this step. Otherwise, MinIO can provide you with an example set of TPC-H data (anonymized) with which to test with. It is located at this link as a zip file: tpch.zip
Delta Tables are structured in a hierarchical manner that can be prefixed with a bucket and directory path for storage Delta files and Delta logs. The steps to add a sample Delta table is as follows:
- Create a bucket called “testdelta” (link)
(Example) mc mb minio/testdelta - Copy the folder structure into the bucket (link)
(Example) mc cp –recursive ~/tpch minio/testdelta/tpch - Verify that the data is visible from the API (link)
(Example) mc tree –files minio/testdelta
We should now be able to query the Delta tables from either Python or PySpark, which we will cover later in this guide.
Adding an AIStor Tables Warehouse and Namespace
The Apache Iceberg table format can utilize a variety of catalogs to store critical metadata. In the case of AIStor Tables, a REST catalog is integrated with the AIStor object storage starting with the January 14, 2026 EDGE releases.
The REST catalog in AIStor enables management of Iceberg tables by provisioning a bucket (if one is not already defined) in addition to data file management. AIStor is inherently strongly consistent and ensures that all data and metadata are written to the drives before additional requests are fulfilled (no “dirty reads”).
Iceberg tables are structured in a hierarchical manner within AIStor, but the directory path is prefixed with a UID that is generated once the tables are created. Although can be prefixed with a bucket and directory path for storage Delta files and Delta logs. The steps to add a sample Delta table is as follows:
- Create the warehouse in AIStor (example) mc table warehouse create minio testice
- Verify the warehouse in AIStor exists (example) mc table warehouse ls minio
- Create the namespace in AIStor (example) mc table namespace create minio testice tpch
- Verify that the namespace and warehouse are available (example) mc table namespace list minio testice
- Verify that the bucket is created in AIStor (example CLI) mc ls minio/testice
- Upload the python notebook (csv2iceberg_aistor.ipynb) and customer data (customer.csv) into the Jupyter Lab environment
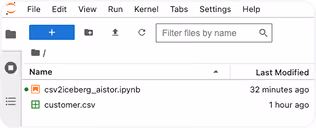
7. Open the csv2iceberg_aistor.ipynb notebook and verify the configuration settings and variables
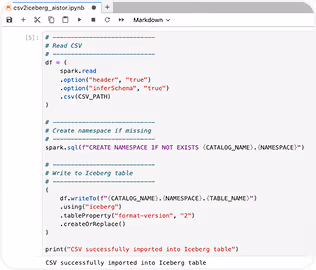
8. Run the notebook and verify that the table data was added correctly
We should now be able to query the Iceberg table from either Python or PySpark, which we will cover later in this guide.
Adding the sample notebooks
Working with AIStor Tables and Table Sharing is easily accomplished with Jupyter Labs and their “notebook” feature. It is an efficient way to work locally (Docker container) but also in a shared environment with Jupyter Studio.
The following link provides an example of a credentials file, a delta sharing file, and sample notebooks. jupyter_assets.zip
The following examples will demonstrate how to work with AIstor Tables and Table Sharing for both Delta and Iceberg Tables.
Before we begin, you should have an appropriate environment already enabled and define the correct variables in a credentials file (i.e. credentials.json) to avoid storing passwords directly in your notebooks that may be shared with others later on. This is especially important when working with centralized/managed resources where multiple users are involved.
Example credentials file: (credentials.json)
{
   "aws_access_key": "minioadmin",
   "aws_secret_key": "minioadmin",
   "minio_host": "http://localhost:9000"
}
NOTE: When working in a shared environment, pay close attention to whether there needs to be TLS enabled on the endpoint or if it is unsecured.
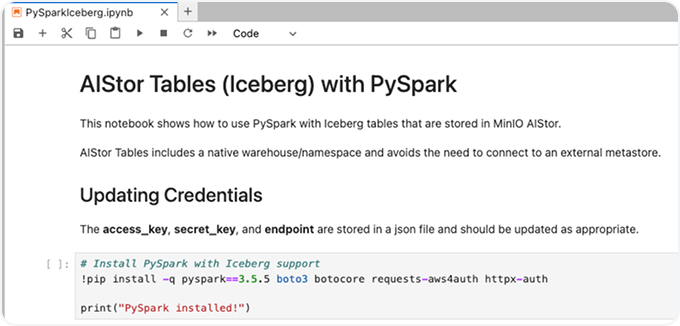
Query Iceberg Tables (PySpark)
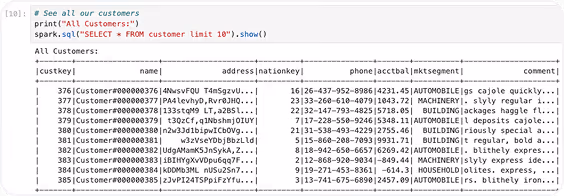
An example notebook is available from this download site. It provides a method for querying the first 10 rows from a table that is defined in our warehouse and namespace.
See: PySparkIceberg.ipynb
It can be uploaded through your browser session directly into your Jupyter Labs notebook. Throughout the notebook, there is important information regarding TLS settings and version compatibility.
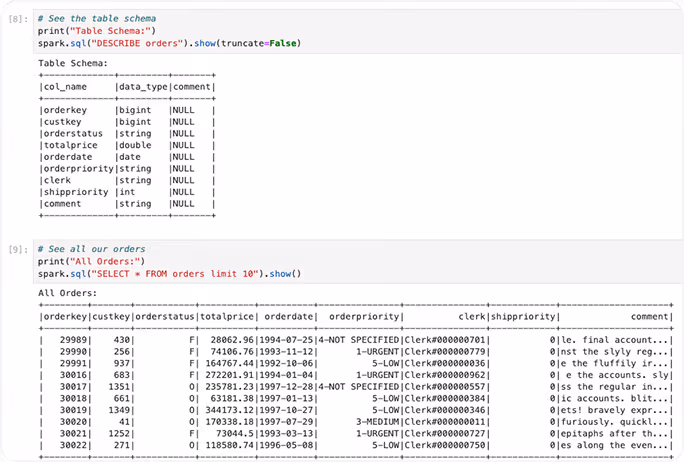
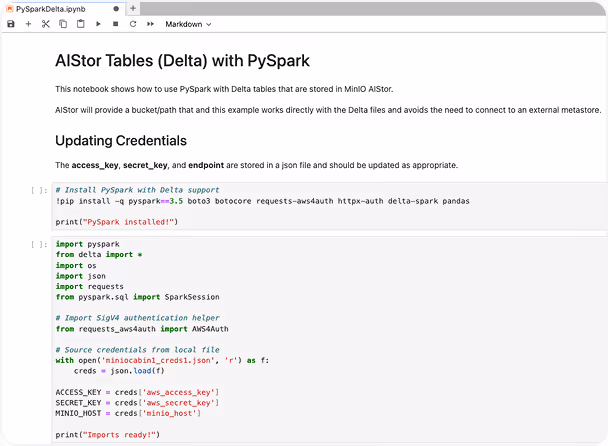
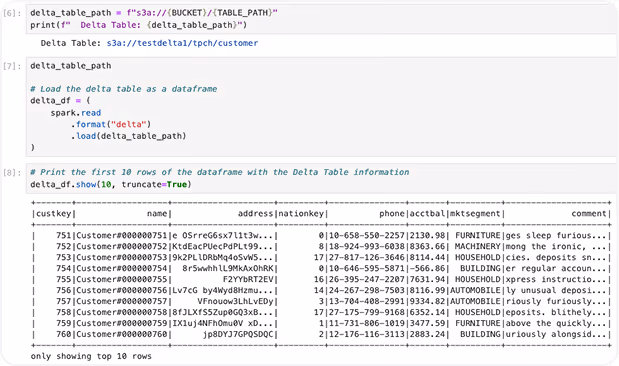
Querying Delta Tables (PySpark)
An example notebook is available from this download site. It provides a method for querying the first 10 rows from a table that is defined in our bucket and path.
See: PySparkDelta.ipynb
It can be uploaded through your browser session directly into your Jupyter Labs notebook. Throughout the notebook, there is important information regarding TLS settings and version compatibility.
AIStor Table Sharing
With the release of the AIStor Table Sharing feature, administrators can provide read-only access to both Iceberg and Delta tables from within the same AIStor endpoint. The Delta protocol was originally designed for just Delta tables, but the specification also provides for Iceberg tables where an existing catalogis available.
AIStor Table Sharing utilizes the integrated Iceberg catalog that comes with AIStor Tables to make this possible without the need for a 3rd party framework. This reduces complexity while enabling a streamlined method to avoid complexity and reduce friction for data consumers who historically are challenged with security requirements.
The following procedures will cover how to connect to the shares we previously defined earlier in this document. (see “Adding Delta and Iceberg Tables to AIStor”)The only difference between reading from a Delta or Iceberg table that is provided by AIStor Table Sharing is the name of the table - no other programmatical changes are required.
Procedures for adding table shares
- Create an AIStor Table Share (“test”) with a schema called tpch for a Delta table (“orders”) (example) mc table share create minio/test tpch "orders:delta:testdelta:tpch/orders"
- Add an AIStor Table (“customer”) to the schema (“test”) Table Share for an Iceberg table (“customer”)(example) mc table share update minio/test --add "tpch:customer:uniform:testice:tpch:customer"
- List the new AIStor Table Share on our AIStor endpoint (example) mc table share list minio/test
- Verify the tables that are visible in the AIStor Table Share (example) mc table share info minio/test
Share: test
ID: c74c939b-d17a-4b8d-9270-7600ad53a71c
Created: 2026-01-25T23:52:59Z
Updated: 2026-01-25T23:53:57Z

Schemas:
  └─ tpch (2 tables)
      ├─ orders [Delta]
      │   Bucket: testdelta
      │   Location: tpch/orders
      └─ customer [UniForm]
          Warehouse: testice
          Namespace: tpch
Table: customer5. Generate a token (good for 30 days) for our AIStor Table Share
(example) mc table share token create minio/test --expires 30d
root@minio# mc table share token create minio/test --expires 30d --description "test token"
Token created successfully for share 'test'.

Token ID:    238fe2ac-2ed6-4c2d-b7f3-6119049d08ba
Token:       dapie84d6c52a111d5f5ec057c94f18b061ff1a941baeb2b3d42438816c744b52ceb
Expires:     2026-02-13T10:22:05-06:00
Description: test token

⚠️ Save this token securely. It won't be shown again.- Add the token to our share file (using a text editor) and save our changes
{
  "shareCredentialsVersion": 1,
  "endpoint": "http://minio:9000/delta-sharing",
  "bearerToken": "dapie84d6c52a111d5f5ec057c94f18b061ff1a941baeb2b3d42438816c744b52ceb",
  "expirationTime": "2026-11-12T00:12:29.0Z"
}
NOTE: If you need to REMOVE a table from an existing Table Share (i.e. it is no longer required to be shared) it can be performed using the MC command as follows:(example) mc table share update minio/test --remove "tpch/orders"
Delta and Iceberg Table Sharing
When sharing either table format, we only need to confirm that they already exist as part of theshare.ring API.
See: AIStorSharing_DeltaTbl.ipynb
The notebook can be uploaded through your browser session directly into your Jupyter Labsworking directly.
By changing the value for “table_name” based on the table you prefer to work with, “customer” for the Iceberg table and “orders” for the Delta table.
from delta_sharing import SharingClient
import delta_sharing
import pandas as pd

# Path to your Delta Sharing profile (JSON file)
profile_file = "minio.share"  # Replace with your profile file path

# AIStor Table Sharing details
share_name = "test"  # Replace with your share name
schema_name = "tpch"  # Replace with your schema name
table_name = "customer"  # Replace with your table name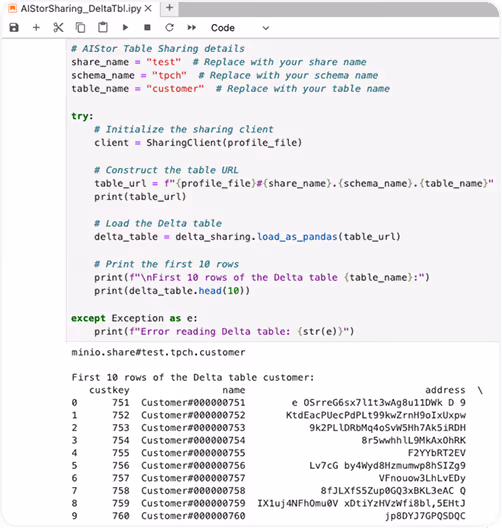
Cleaning up Shares in AIStor
Now that we have verified that we can connect from our Jupyter notebooks, we can remove the share for further access.
(example) mc table share remove minio/test
This will remove all the shares and associated tokens.
Connecting to Databricks (optional)
Overview of Networking and Security requirements
Security Requirements
When working with sensitive information across a public network, care must be taken to limit the risk of exposure to data and credentials.
While it is possible to perform AIStor Table Sharing over HTTP, this is strongly discouraged since the connection is unencrypted. By securing your AIStor cluster with a TLS certificate, all data is encrypted before being transmitted.
Additionally, Databricks strongly recommends only sharing data over TLS through their control plane and the use of CA-signed certificates in production environments.
Sourcing a publicly signed certificate for your external facing proxy/endpoint will provide the most frictionless experience. Self signed certificates can be utilized, but requires working with Databricks to have them properly installed and recognized. Link
Network Requirements
In general, the network topology for presenting AIStor Table Shares to Databricks requires opening a specific port on a public IP address, and preferably assigning a DNS record.
An example of a basic configuration might look like this:
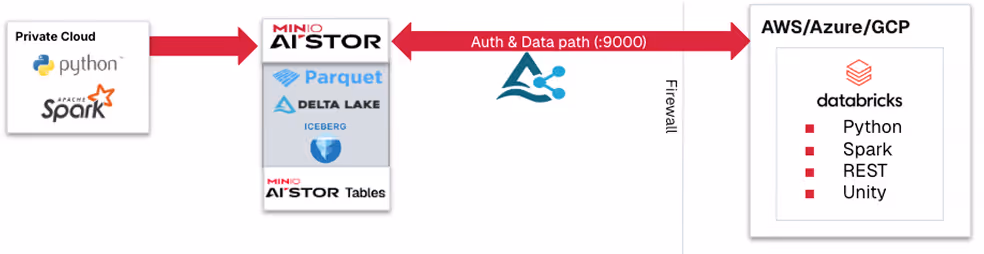
In the diagram above, port 9000 is opened through the internet router and firewall. Local (“private cloud”) services can still work with AIStor endpoints and administrators can update the shares dynamically without interruption of Databricks users that have access to that workspace.
Databricks in AWS
Customers who wish to connect from an AIStor instance to an AWS hosted Databricks service should understand that the VPC that the control plane is managed from will not automatically provide a reverse proxy for non-AWS shares. Therefore you should consult your Databricks and AWS team to determine appropriate steps to open a specific port and address before proceeding.
Databricks in Azure
Azure Databricks will be able to add 3rd party shares with Enterprise, but not personal accounts. A subscription change is required with Azure Databricks to a “Premium” account along with verifying that network connectivity can be established.
Databricks in GCP
Both Enterprise and personal accounts with Databricks can utilize 3rd party shares, unless network restrictions were implemented to clients tunneling through a VPN or based on IP address ranges.
.avif)
Installing a Share
Adding a Delta Share to Unity Catalog
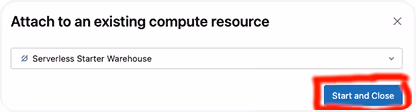
With Metastore Admin privileges, you can add a delta share as a catalog in your Databricks Workspace. To avoid errors in future steps, we recommend activating the “Serverless Starter Warehouse [Serverless]” at this time.
Under “Catalog”, select the gear symbol and choose “Delta Sharing”
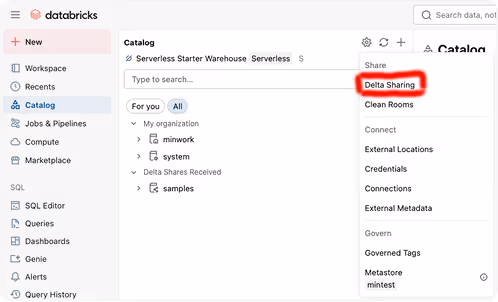
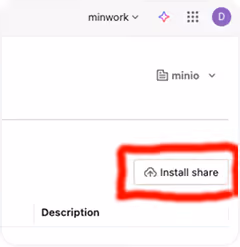
From the Catalog Explorer, you will see a list of the available catalogs that have been shared already for your Workspace. Select the “Install Share” button on theright side of the screen to proceed.
You will need to fill out the “Provider name” and add a suitable credentials file (with the suffix .share) in order to continue. NOTE: The endpoint for the AIStor endpoint where you are using the Table Sharing service must be publicly visible or have already setup a VPN connection to your installation. Please check with your administrators to confirm that a requisite security posture has been established before proceeding.
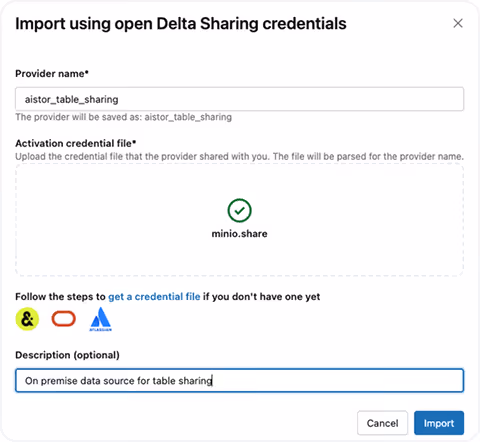
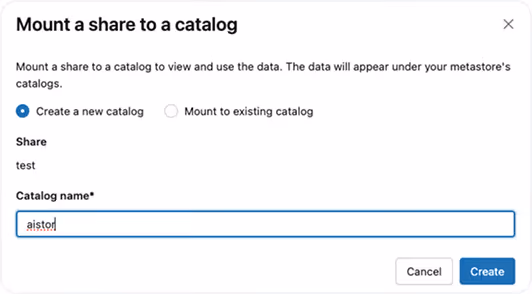
NEVER share data over HTTP, only HTTPS endpoints should be used with outside facing connections. And a publicly signed TLS certificate will be required for Databricks to recognize your endpoint correctly.You will now be given an option to determine which catalog to mount the share with. For this example, we will just create a new one named “aistor”.
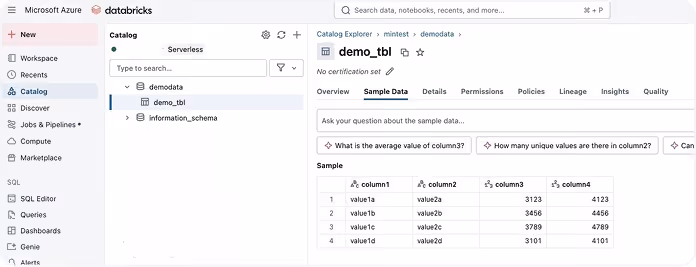
We can now return to the main Catalog page in our Workspace and see that the share is now active. If you open up the tree for “aistor” under the “Delta Shares Received”, you will notice both an “information_schema” and “tpch” schemas have been added and there are two tables for “ customer” (our Delta table) and” orders” (our Iceberg table) .
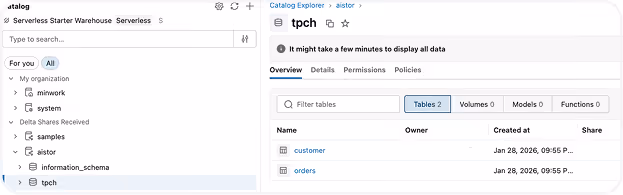
By selecting the customer table and then choosing the tab for “Sample Data”, you should see that the table information matches what was returned from our prior examples. NOTE: Any table you add can be sampled, this example only represents a sample dataset that was freely available.
SQL Queries with Serverless
After confirming that tables are visible in the Unity catalog, a serverless instance can be utilized to run SQL queries against those tables.
NOTE: Depending on the administrator restrictions with your workspace, you may have to determine if your account has privileges to start a serverless engine. Also be aware that due to inactivity, the serverless engine will automatically stop after a period of inactivity.
Below is an example of a SQL join that utilizes the two tables that are shared.
select c.custkey, c.name, SUM(o.totalprice) as sum_order_price
from aistor.tpch.customer c
join aistor.tpch.orders o on c.custkey = o.custkey
group by c.custkey, c.name
having SUM(o.totalprice) > 1000000
order by sum_order_price desc;.avif)
Cleaning up Shares (Databricks)
Now that we have verified that we can connect from Databricks into AIStor, we can remove the demonstration artifacts.
Step 1 - Delete the Share from the catalog
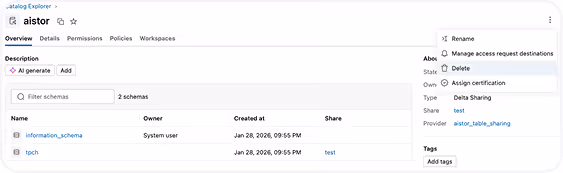
You can select “Delete” and confirm on the following page. This will remove the Share from the catalog as well as schemas and tables.
Step 2 - Remove the Sharing Provider
.avif)
Proceed to delete the “aistor_table_sharing” provider and select the “Delete” button on the subsequent dialog box. Your Workspace has been returned to the previous state.